
When you first get started with MIG welding, one of the hardest things to master can be how to set your welder.
If this is your first time using a MIG welder, you need to familiarize yourself with three main settings.
Unfortunately, there is no clear-cut way to set up a machine. Every MIG welder is a little different, so you can’t copy someone else’s settings.
But don’t panic; you can quickly learn how to properly set your MIG welder and get welding in no time.
Variables to Consider First
Before you start trying to weld, take a quick look at some factors that affect the process. Things like the material you want to weld, the wire you plan to use, and even the machine all play a role in finding the proper settings.
MIG welding looks really easy, but most people do not realize just how much of a science there is to the craft.
Type of Metal
The first thing you need to look at is the type of metal you plan to weld. There is a major difference between the types of metal, especially ferrous metals such as steel and non-ferrous metals such as aluminum.
In general, non-ferrous metals will need much more heat, requiring a higher setting. Metals also come in various mixtures, known as alloys, that can further complicate matters.
Thickness
Regardless of which type of metal you use, its thickness will play a large part in adjusting your welder. Thicker materials need more heat to get good penetration, and they also need more wire.
On the other hand, thinner metal requires lower settings to prevent burning a hole in the material.
Wire Type/Size
There are many choices for MIG welding wire, but if you just plan to weld mild steel, it’s best to stick to a standard .030 or .035 ER70S-6 wire.
This will be good for most jobs up to about ½”. However, you will need special wire if you plan to weld other metals, such as aluminum.
Also, consider whether or not to get the flux-cored wire. This prevents the need for shielding gas and burns a little hotter.
The downside is that it is a little messier since it does leave slag behind. It also costs a fair amount more than regular MIG wire, but we’ll cover flux welding more below.
Equipment
Every welder is different, even between the same manufacturer and sometimes the same models. Therefore you should take time to understand your particular welder and its settings.
In most cases, they come with a guide or chart that will get you close to the correct settings, and you can dial it in from there.
However, you should also consider some other factors for your welder. For instance, the polarity on some MIG welders is changed by moving internal lugs around, while others require switching the ports on the front of the machine.
Welding machines also have a wide variety of controls. For example, most lower-end and consumer model welders use plain dials that correspond to a rough value.
In comparison, higher-end welders have digital readouts that can be finely tuned to particular metrics.
Position
The ideal welding position is always flat. However, that is often not possible, depending on the metal’s shape and whether or not the weld area is attached to a larger structure.
Remember that your welder’s recommended settings are for ideal scenarios such as welding flat. You will need to adjust accordingly if you weld upside down or vertically.
The 3 Most Important Settings to Master
The three settings you have to master on a MIG welder are wire feed, voltage, and gas pressure. These three settings must be perfectly aligned to get a perfect weld.
One other thing to note here is that these settings are also affected by your welding technique, such as the pattern and speed you move your hand.
Voltage
Voltage is the amount of power or heat going into the metal. This causes the metal to melt and the two surfaces to combine with the filler material.
Finding the right voltage can be tricky because if it is too hot, the weld will melt through the metal. But without a high enough current, you won’t get good penetration and bonding.
Wire Feed Speed
Getting the wire’s feed speed right is also critical to getting a good weld. A speed that is too fast will lead to messy welds and force you to move more quickly, which can lead to poor penetration.
On the other hand, too slow of a speed will lead to the arc stopping and wire burning back to the nozzle tip.
While on the nozzle topic, ensure that you consistently hold your MIG gun at the same distance from your material and travel at a steady speed.
Shielding Gas
The last major factor you need to worry about is the shielding gas. You have to use shielding gas when MIG welding, but there are numerous gasses you must choose between according to the metal being welded.
In addition to choosing the right type of gas, the regulator must also be set to allow proper flow. The flow rate varies by material thickness and also your environment.
For example, welding outside requires a much higher flow rate to combat wind.
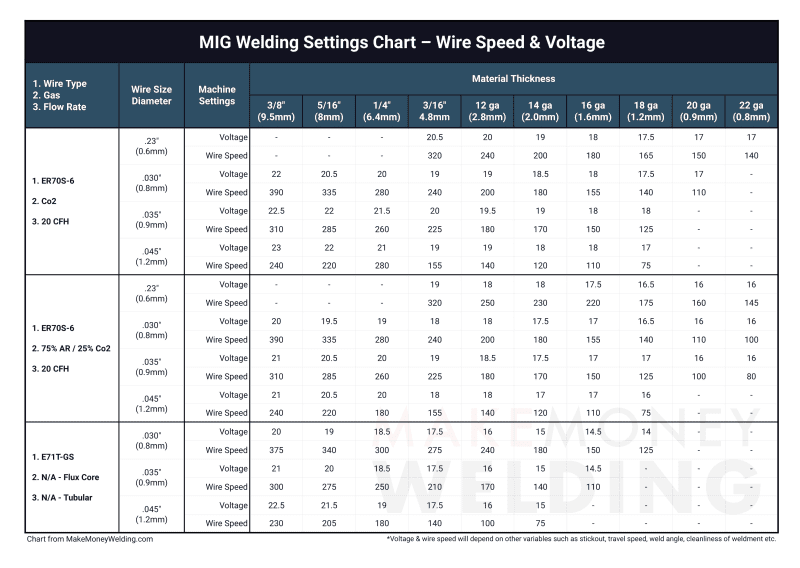
Mild Steel Settings Chart
Mild steel is the most common metal you will encounter. It is used for many applications and is an excellent choice if you need strength and don’t mind a little weight.
It is also affordable compared to other metals such as stainless steel and aluminum.
Take a look at the chart below for some starting settings:
Different Settings for Aluminum and Stainless Steel
Although mild steel is the most commonly welded material, you may also want to work with other metals, such as aluminum or stainless steel.
Each of these metals has its own unique properties that make them a good choice for a host of uses. However, they also require special wire, gas, and settings.
Aluminum
MIG welding aluminum can be difficult, and getting good results is even harder. First, you will likely need a different shielding gas than what you used previously; 100% argon is a good choice.
You will also need a different wire, such as ER4043. But, the welder’s settings will also need adjusting to compensate for the higher temperature needed to melt the metals. Lastly, you should consider using a spool gun, as the MIG wire can easily clog the line.
Stainless Steel
Stainless steel shares many similarities to carbon steel, but it, too, requires different welding wire and gas mixes. For welding wire, use ER308L and about 98% argon with 2% CO2.
There are other options to choose from, but that will get you started. In addition, stainless steel requires higher voltage and feed settings to create a good arc.
Related: MIG Welding Stainless Steel Tips
Welding Calculators
Until you get the hang of feeds and speeds, using a calculator like the one provided by Miller is a good idea.
These settings won’t be exact, but they will at least get you in the ballpark. At that point, you can begin fine-tuning the settings to a bead.
Do this by welding a short bead and consulting with the image above. Then, make one small adjustment at a time until it is good.
What About Flux-Cored Settings?
Flux-cored welding works slightly differently than MIG since it doesn’t require a shielding gas. It also burns hotter, so your welder’s voltage doesn’t need to be set as high.
However, flux-cored welding has advantages and disadvantages that you should learn about before deciding which way to go.
The good news is that a MIG welder can run flux-cored wire (but flux-cored welders cannot be used for MIG welding). All you have to do to swap from MIG to flux-cored is reverse the polarity.
On some welders, all you have to do is swap the port the leads plug into, while other welders require swapping wires around inside the machine.
Some welders also offer “easy” settings that only require you to set the welder to a specific thickness. While this works well for most hobbyists, professionals will find the setting annoying.
Keep in mind that the settings for flux-cored welding are entirely different and will have their own learning curve.
FAQ
What are the 2 “main” settings on a MIG welder?
The two main settings on a MIG welder are wire speed and voltage. Two separate knobs control these on most MIG welders. However, not all welders use the same settings, so you should read your welder’s manual to understand what the numbers represent.
What voltage should my MIG welder be set at?
The settings vary greatly on MIG welders, so it is impossible to make a recommendation without knowing certain information. Also, some MIG welders do not have voltage written on them and instead use a numbering system representing a given range.
How many amps should I weld at?
The amount of amps required to weld two pieces of metal depends on the thickness and type of metal. To help determine the proper amperage for your needs, use the chart above or a calculator to determine power and feed speed.
Can you change amps while welding?
Changing amps while welding a bead would be near impossible since you would have to turn toward the machine with the arc still going. However, you can change the amp setting while the welder is turned on for most machines.
What happens if the amperage is too high welding?
Too high of an amperage while welding will cause the metal to melt more than it should. On thicker metals, you may notice that the weld bead is sunk into the metal, creating a slight depression.
But the more common sign is the arc blowing a hole in the metal. This will be obvious as a hole will form while trying to weld and keep growing if you continue running a bead.
Wrapping It Up
Setting up a welder is more complicated than you may have first thought. Unfortunately, there is no shortcut to welder settings either.
However, some machines have user interfaces for hobbyist welders to easily use without knowing how controls such as feeds and power work.
While getting people interested in welding is a good thing, keep in mind that there are limitations to these easier-to-use welders.
In addition, you should start learning how to dial in your weld settings. That way, you can better understand how different metals and thicknesses affect your welder’s settings.
